
Artlantis For SketchUp helping you to complete even the most ambitious projects, and giving your presentations the look you want.
export process SketchUp to Artlantis will result in an Artlantis .atl file
Now, let's see in detail what Artlantis can take over from your SketchUp Pro model:
Step 1 : Modeling in SketchUp Pro
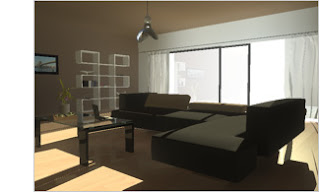
First, start to model your project with SketchUp Pro. For example, her we will model a lounge; we modeled the structure and only a few details, knowing that Artlantis will be used to set the entire scene.

Warning: Create your model carefully; avoid reversed faces! Between positive and negative sides of surfaces Artlantis will always interpret the positive one only. Any differentiation or mapped texture will disappear if the face is reversed.
Step 2 :Export SketchUp Pro to Artlantis
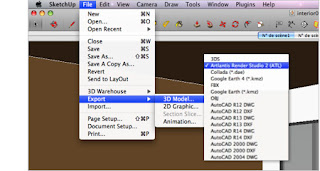
With the plug-in Artlantis export we will create an Artlantis file (.atl). Click on File / Export / 3D model... Then select Artlantis Render Studio (ATL) in the format's list.
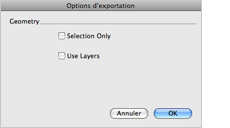
Open the Option dialog box and you will find two different ways to export a model to Artlantis.
1 - Selection Only
2 - Use Layers
1. Export using Layers The "Use Layers" choice allows you to assign in Artlantis the same material to all elements that are grouped on the same layer in SketchUp Pro.
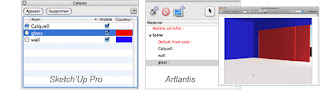
Example : My three Layers in SketchUp Pro are Calque0, glass and wall and each will become an independent material in Artlantis. The geometry will receive the color of the appropriate SketchUp Pro layer.
Beware: Always check in which layer the contents of a group is to avoid a problem when you export, because the group can be in Layer A and its contents in Layer B and in this case the color of Layer B will be applied to the entire group.
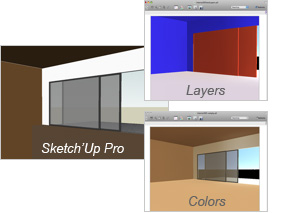
2. Export using Colors
Here, since we made sure to separate geometry with colors in SketchUp Pro, we don't check "Use Layers."
The best solution remains exporting using colors. Separate your geometry with different colors in SketchUp Pro, to recover a separation of materials of surfaces on which you will just have to apply your shaders in Artlantis.
Before exporting, you have to make a selection. You can select the entire model, or only a part of it, depending what you would like to transfer as geometry in Artlantis.
Then choose: File > Export > 3D Model. Open the Options dialog box and check "Selection Only." Close it, name the file, and finish the export. A dialogue then informs us that the export was successful.
Step 3 : Set your scene with Artlantis
Open the .atl file created using Sketch'Up Pro in Artlantis. Add texture, lights and insert objects into your scene to give it a touch of realism.
Step 4 : Update the file in SketchUp Pro
In the event you need to change the model, note that you won't lose Artlantis data.
Here is the method: First, make your edits on your model in SketchUp Pro. Here, we modify the lounge by adding windows on the ceiling. Once the change is made, we simply create a new Artlantis file. The method is strictly the same as for Step 2.
Repeat the operation, but make sure to change the file name in order not to overwrite your first Artlantis file.

Step 5 : Update the file in Artlantis
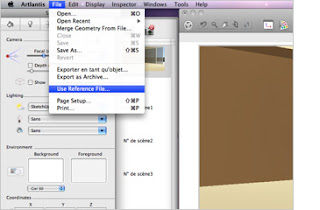
Then just open the new .Atl file in Artlantis. When opened, go to File/Use reference file
A new dialogue box appears: First, select the location of your old .atl file that you had prepared and select it. Then you have many options; you can transfer from the first Artlantis file into the second one. First, you can recover all shaders of your first scene in your new one.
Choose this option.

Then you have the possibility to recover all the information from your first file. Here we select all options. You can recover : Then click on OK. Your new file has been updated with the data from your first version.
More Artlantis For Sketchup Tutorial in Movies.
Download Artlantis for Sketchup tutorial PDF
Free Download Artlantis for Sketchup 8 plugin and Free Download Artlantis 4.0.16
sese
ReplyDelete